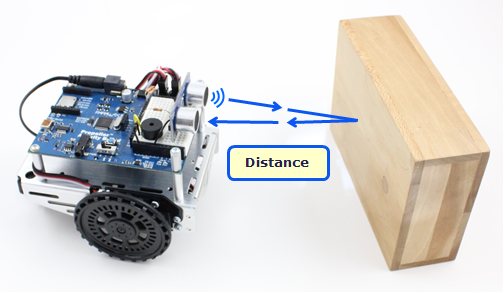
Now that you can measure centimeter distances with the PING))) sensor, and know which kinds of objects it can sense, let’s combine the sensor's input with the servo motor's output.
Our goal is for the ActivityBot to roam and avoid objects using sound with the PING))) sensor. In one way, this is an improvement over whisker-switch navigation, because the ActivityBot does not have to bump into objects to detect them.
But, there is a key difference: there were two whisker switches. With whiskers, the ActivityBot could tell whether an obstacle was on the left or the right, and then turn away in the opposite direction. The PING))) sensor returns a distance value but does not indicate whether the obstacle is more to the left or the right.
Let's start with test code that makes the ActivityBot turn right or left at random when an object comes within 20 cm. Once that is working and tuned, then you'll add blocks for roaming.

Test the Random Turn Maneuver
This example program makes the ActivityBot stay still until the PING))) measured distance is 20 cm or less. Then, it turns in place until it measures more than 20 cm, which means the robot turned until the object is no longer visible.
- In BlocklyProp, create a new project named Ping Detect and Turn.
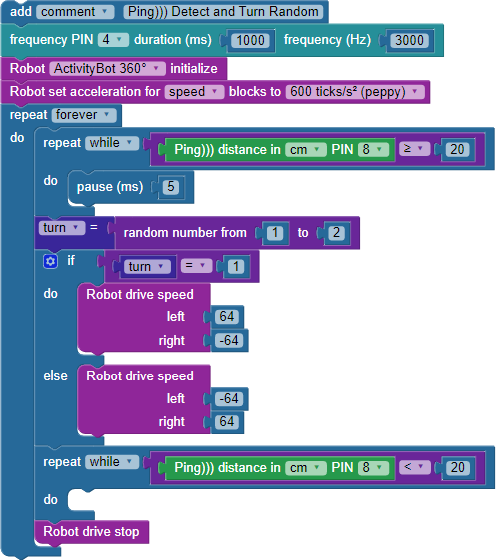
- Build the project shown below.
- Be sure to set the Robot initialize block's dropdown to your particular robot: ActivityBot or ActivityBot 360° before you save it.

- Connect your robot to your computer and set the power switch to 1.
- Click the Load and run (save code to EEPROM) button.
- Disconnect your robot from its programming cable, put it on the ground, and set the power switch to 2.
- Hold your hand in front of the ActivityBot about 30 cm (~ 1 ft) away, then slowly move it closer. The ActvityBot should turn away from your hand.
- Try it several times so you can see that the direction it turns is random.
- Try holding an open book or binder in front of the ActivityBot. Notice the ActivityBot it will rotate longer until it is clear of the wider obstacle.
How it Works
Since this code makes the robot drive, it begins with a frequency out block for the brownout indicator piezospeaker on P4. Next comes the required Robot ActivityBot initialize block. The Robot set acceleration block is set to a moderate 600 ticks/s2 to start.
The rest of the code is in a repeat forever loop. It begins with a repeat while loop. The while condition is a compare values block, checking to see if the value provided by the Ping distance block is greater than or equal to 20. If the answer is true, the code executes the pause 5 (ms) block and then checks the PING))) sensor again. This action will keep repeating, effectively putting code execution on standby until the while condition is no longer true.
When that happens, code execution drops down to the next block. The set variable block makes turn equal to a random number from 1 to 2. That's the BlocklyProp way of flipping a coin to decide which way the ActivityBot should turn. The "coin flip" is checked in the if...do...else...if block. If turn = 1 is true, then the block Robot drive speed left 64, right -64 gets executed, and the ActivityBot turns right. If turn = 1 is not true, then the block next to else is executed, and Robot drive speed left -64, right 64 makes the ActivityBot turn left.
The if...then...else...if block is followed by another repeat while loop. This time, the while condition checks if the Ping distance measurement is less than 20. The code execution stays in standby mode as long as this is true. Staying in standby mode allows the ActivityBot to continue its rotation maneuver until the PING))) sensor reports a measurement greater than 20, meaning that it has turned past the obstacle. Then, code execution continues to the Robot drive stop block which makes the ActivityBot quit turning.
Finally, the code execution returns to the top of the repeat forever loop, where it once again will sit still and check the PING))) distance every 5 ms until an object comes closer than 20 cm.
Did You Know?
Redundant subsystems - Whiskers switches rely on touch, and the PING))) sensor relies on ultrasound. As you may have noticed, each one has advantages and disadvantages. In real-world control systems, different types of sensors that depend on various physical properties are often used together, which can help make the system more reliable under a wider variety of conditions. Where risk is low, redundant sub-systems can seem silly, like wearing a belt with a pair of suspenders. But where risk is high, redundant subsystems are critically important. Can you think of any examples?
Try This – Roaming with PING)))
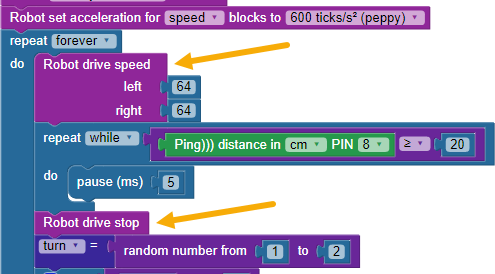
By adding just two blocks, the example code above can free the ActivityBot to roam. Right now, the ActivityBot stays still unless it detects an object within 20 cm. All that is needed is a block that allows it to drive forward unless an object is detected within 20 cm. If an object is detected that close, it must stop driving forward before performing the turn-away maneuver.
- Save a copy of the project as Ping Roaming Turn Random.
- Add a Robot drive speed block just above the first Repeat while block.
- Add a Robot drive stop block just below that first Repeat while block.

- Save your code, connect your robot to your computer and set the power switch to 1.
- Load the code to EEPROM, disconnect your robot, and put it on the floor.
- Hold down the reset button while you set the power switch to 2, then let go and watch your ActivityBot roam!
Your Turn
- Build a maze out of boards or boxes that you can easily move around. Make the walls about 15 cm high and 45 cm apart.
- Try letting your ActivityBot roam in the maze.
- Tune your ActivityBot so it can better navigate the maze. That may mean slowing it down, tuning the acceleration, and reducing the PING))) distance that triggers the turns.
- Try narrowing the maze corridors as much as you can but still leaving it wide enough for your ActivityBot to navigate.
- The simplest initial approach to exploring a maze is to take a right turn at each wall. (Not necessarily the best approach, but certainly the simplest.) Modify the code so that it only turns right when it encounters an obstacle, and see how it goes!
