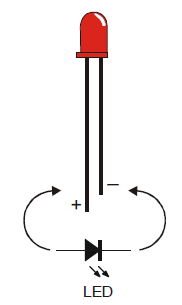
Introducing the LED
A diode is a one-way electric current valve, and a light-emitting diode (LED) emits light when current passes through it. Since an LED is a one-way current valve, you have to make sure to connect it the right way for it to work as intended.
An LED has two terminals: the anode and the cathode. The anode lead is labeled with the plus-sign (+) in the part drawing, and it is the wide part of the triangle in the schematic symbol. The cathode lead is the pin labeled with a minus-sign (-), and it is the line across the point of the triangle in the schematic symbol.

When you build an LED circuit, you will have to make sure the anode and cathode leads are connected to the circuit properly. You can tell them apart by the shape of the LED’s plastic case. Look closely at the case—it’s mostly round, but there is a small flat spot right near one of the leads, and that tells you it’s the cathode. Also note that the LED’s leads are different lengths. Usually, the shorter lead is connected to the cathode.
Always check the LED’s plastic case.
Usually, the longer lead is connected to the LED’s anode, and the shorter lead is connected to its cathode. But sometimes the leads have been clipped to the same length, or a manufacturer does not follow this convention. So, it’s best to always look for the flat spot on the case. If you plug an LED in backwards, it will not hurt it, but it won’t emit light until you plug it in the right way.
