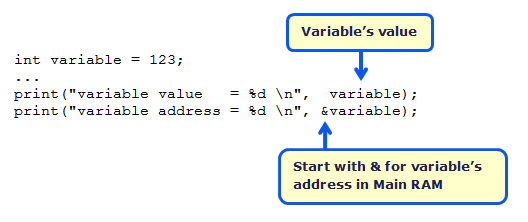
Up to now, we’ve been dealing with what values variables store, but there are some useful functions that need to know where the values are stored instead. So, to get ready for activities that use those kind of functions, let’s look at a simple way to get the variable’s address in RAM – by preceding it with the & operator.
In this activity, you will also experiment with how addressing of array elements work in the Try This and Your Turn sections.
Test Code
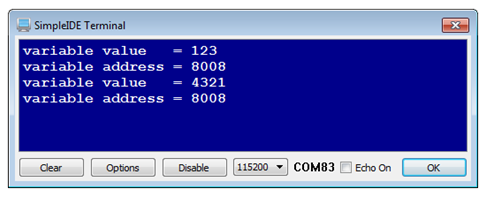
Here is an example where a print statement displays the value an int variable (that’s named variable), and another print statement displays the address where that value is stored, with &variable. After changing variable’s value, a third print displays the variable’s new value, but the fourth print (again with &variable) shows that the address has not changed.
If you haven't already installed the latest USB driver, SimpleIDE, or Learn folder, go to Propeller C - Set up SimpleIDE and Propeller C - Start Simple.
This test code is not yet in the SimpleIDE/Learn/Examples folder, so follow these instructions for creating a new project with new code:
- Click SimpleIDE’s New Project button.
- Set the folder to …Documents\SimpleIDE\Learn\Examples\C Intro\Basics\
- Set the File name to Variable Value and Address.
- Copy the code below into SimpleIDE.
- Set the power switch to position 1 if it isn't already (if applicable for your board).
- Click the Run with Terminal button.
- Verify that the SimpleIDE Terminal display resembles the example above.
/*

 Variable Value and Address.c

 Display a variable’s value and its address.

*/

#include "simpletools.h"                         // Include simpletools library

int variable = 123;                              // Declare/initialize variable

int main()                                       // Main function

{

 print("variable value   = %d \n",  variable);  // Display variable value

 print("variable address = %d \n", &variable);  // Display variable address

 variable = 4321;

 print("variable value   = %d \n",  variable);  // Display variable value

 print("variable address = %d \n", &variable);  // Display variable address

}
How it Works
The program starts by declaring an int variable (named variable) and initializing it to the value 123 with:
int variable = 123;
In the main function, the first print call displays variable’s value with the expected result of 123.
print("variable value = %d \n", variable)
So, at this point we expected the value to be 123, but what is variable’s address? A simple “address of” & operator to the left of variable returns its address instead of its value. The address is the number of bytes from the start of Main RAM.
print("variable address = %d \n", &variable);
After setting the variable’s value to something different, print("variable value = %d \n", variable) displays the new value, but print("variable address = %d \n", &variable) shows that the variable’s address is unchanged.
Did You Know?
The addresses in Propeller Main RAM are expressed as byte addresses. It’s the number of bytes from the start of Main RAM.
This approach works for most variable types, including int, short, byte, and float.
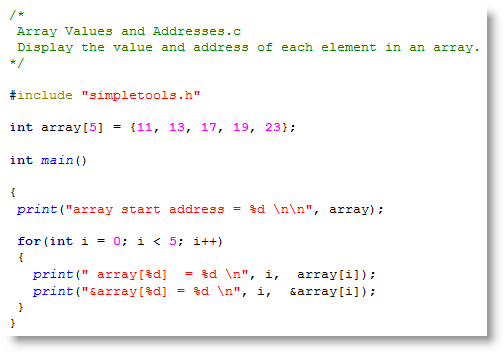
The & operator can also be used to get addresses of array elements. For example, with the array:
int array[5] = {11, 13, 17, 19, 23};
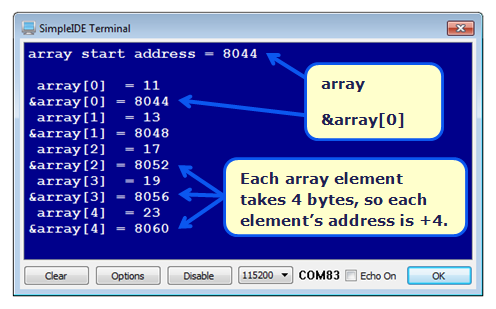
…your code could get the address of the third element (containing 19) with &array[3]. Here is an example of a print statement that displays it:
print("array[3] address = %d \n", &array[3]);
There is more than one way to get the zeroth element’s address (containing 11). Although code can use &array[0], it’s more common to just use array. So, these two print statements do exactly the same thing:
 print("array[0] address = %d \n", &array[0]);  // Display address of array[0]

 print("array[0] address = %d \n",  array);     // Display it again
Each element in an int array has 4 bytes, so the address of the second element will be 4 higher than the address of the first element, and so on. A char array would be different since each element only has one byte. So, each element’s address only increases by one over the previous element.
Try This
Let’s prove that each array element takes four bytes, and also that array can be used interchangeably with &array[0] to get the starting address of an array.
- Use the Save Project As button to save a copy of your project named Array Values and Addresses in …Documents\SimpleIDE\My Projects.
- Modify the variable declaration and main function to make your code match what is shown below.
- Run the program and verify the output.
Your modified program’s SimpleIDE Terminal output should resemble this.
IMPORTANT: Passing the address of the first element in an array by using the array’s name is a very common practice; it is a good idea to get comfortable with it. Most code examples will use array instead of &array[0] for the starting address of an array.
Your Turn
The Did You Know section mentioned that a char array has one byte per element.
-
Modify the Try This code to use a char array instead of an int array to test and verify this.