Here's a leader BOE Shield-Bot followed by a shadow BOE Shield-Bot. The lead robot is running a modified version of FastIrRoaming (with maneuver speeds reduced to +/- 40). The shadow BOE Shield-Bot is running FollowingShieldBot. One lead robot can string along a chain of 6 or 7 shadow robots. Just add the paper panel to the rest of the shadow BOE Shield-Bots in the chain.
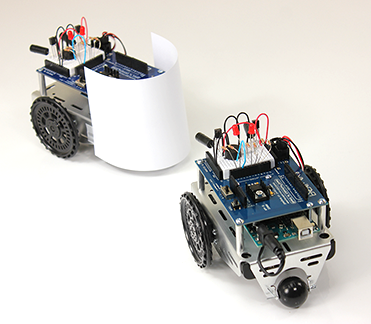
- If you are working on your own with one BOE Shield-Bot, you will be the leader! The leader-object can be a book, bottle or even just your hand.
- If you are part of a class with two or more BOE Shield-Bots, mount a paper panel around the tail and both sides of a lead robot to make it more visible to the shadow robots, like in the picture. If you are making a chain of shadow robots, put a paper panel on each of them too.
- Program the lead BOE Shield-Bot with SlowerIrRoamingForLeaderBot.
- Program each shadow BOE Shield-Bot with FollowingShieldBot. Each shadow robot’s IR LEDs should be pointing slightly to the left and right, and level with horizontal (not up or down).
- Place a shadow BOE Shield-Bot behind the lead BOE Shield-Bot or other leader-object. The shadow BOE Shield-Bot should follow the leader at a fixed distance, so long as it is not distracted by another object such as a hand or a nearby wall.
/*
 * Robotics with the BOE Shield - SlowerIrRoamingForLeaderBot
 * Adaptation of RoamingWithWhiskers with IR object detection instead of
 * contact switches
 */

#include <Servo.h>                           // Include servo library

Servo servoLeft;                             // Declare left and right servos
Servo servoRight;

void setup()                                 // Built-in initialization block
{
  pinMode(10, INPUT);
  pinMode(9, OUTPUT);   // Left IR LED & Receiver
  pinMode(3, INPUT);
  pinMode(2, OUTPUT);    // Right IR LED & Receiver

  tone(4, 3000, 1000);                       // Play tone for 1 second
  delay(1000);                               // Delay to finish tone

  servoLeft.attach(13);                      // Attach left signal to pin 13
  servoRight.attach(12);                     // Attach right signal to pin 12
}

void loop()                                  // Main loop auto-repeats
{

  int irLeft = irDetect(9, 10, 38000);       // Check for object on left
  int irRight = irDetect(2, 3, 38000);       // Check for object on right

  if((irLeft == 0) && (irRight == 0))        // If both sides detect
  {
    maneuver(-40, -40, 20);                // Backward 20 milliseconds
  }
  else if(irLeft == 0)                       // If only left side detects
  {
    maneuver(40, -40, 20);                 // Right for 20 ms
  }
  else if(irRight == 0)                      // If only right side detects
  {
    maneuver(-40, 40, 20);                 // Left for 20 ms
  }
  else                                       // Otherwise, no IR detects
  {
    maneuver(40, 40, 20);                  // Forward 20 ms
  }
}

int irDetect(int irLedPin, int irReceiverPin, long frequency)
{
  tone(irLedPin, frequency, 8);              // IRLED 38 kHz for at least 1 ms
  delay(1);                                  // Wait 1 ms
  int ir = digitalRead(irReceiverPin);       // IR receiver -> ir variable
  delay(1);                                  // Down time before recheck
  return ir;                                 // Return 1 no detect, 0 detect
}

void maneuver(int speedLeft, int speedRight, int msTime)
{
  // speedLeft, speedRight ranges: Backward  Linear  Stop  Linear   Forward
  //                               -200      -100......0......100       200
  servoLeft.writeMicroseconds(1500 + speedLeft);   // Set left servo speed
  servoRight.writeMicroseconds(1500 - speedRight); // Set right servo speed
  if(msTime==-1)                                   // if msTime = -1
  {
    servoLeft.detach();                            // Stop servo signals
    servoRight.detach();
  }
  delay(msTime);                                   // Delay for msTime
}
Your Turn – Experiment with the Constants
You can adjust the setpoint and proportionality constants to change the shadow BOE Shield-Bot’s behavior. Use your hand or a piece of paper to lead the shadow BOE Shield-Bot while doing these exercises:
- Try running FollowingShieldBot using values of kpr and kpl constants, ranging from 15 to 100. Note the difference in how responsive the BOE Shield-Bot is when following an object.
- Try making adjustments to the value of the setpoint constant. Try values from 0 to 4.
You might notice some odd behaviors. For example, if the set point is 0, it won’t back up. Want to figure out why?
- Repeat the control loop exercises from Activity #1 with the set point at zero. Can any measured distance cause it to back up with a set point of zero?