The Propeller microcontroller has 32 input/output pins, or I/O pins, that are designed to interact with other circuits. The circuits in this example are built into the Propeller Activity Board's printed circuit board, but later examples' circuits are constructed using the white breadboard prototyping area. This tutorial can be done using a Propeller FLiP module as well.
We'll experiment with the "O" (output) feature of an I/O pin by programming the Propeller to use an I/O pin to turn a light on and off.
Circuit
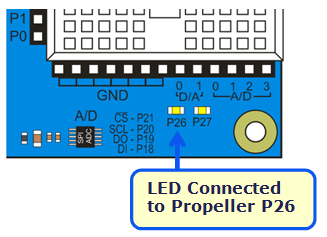
Our light circuit is already built into the Propeller Activity Board (original or WX version), Propeller FLiP, and the Propeller Board of Education.
- Locate the small LED light.
- For the Propeller Activity Board and Propeller Board of Education: It's a small part just above the P26 label in the lower-right corner of your board.
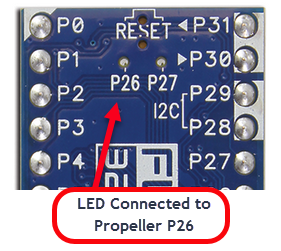
- For the Propeller FLiP: It's a small hole in the upper middle part of the module (containing an inset LED), with a P26 label underneath.
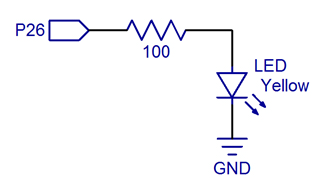
Note: if you are using a different Propeller board, build the equivalent circuit using the schematic.
Test Code
- If you haven't already installed the latest USB driver, SimpleIDE, or Learn folder, go to Propeller C - Set up SimpleIDE and Propeller C - Start Simple.
Now, let’s try running an example program that blinks the LED light connected to P26.
- Click SimpleIDE’s Open Project button.
- Navigate to ...Documents\SimpleIDE\Learn\Examples\Circuits.
- Open Blink Light.side.
- Set the power switch to position 1 (if applicable for your board).
- Click the Load RAM & Run button.
- Verify that it makes the P26 light blink.
How it Works
The function call high(26) sets the Propeller chip's P26 I/O pin to output-high, which connects the pin to its 3.3 V supply. The pin applies 3.3 V of electrical pressure to the LED circuit, causing electric current to pass through it and the light to turn on. After that, pause(100) makes the program do nothing for 100 ms, which keeps the light on for 1/10 of a second.
Next, low(26) sets P26 to output-low, which connects the pin to its 0 V ground supply voltage instead. This takes away the electrical pressure, so the current stops flowing through the circuit and the light turns off. Another pause(100) makes the light stay off for 1/10 of a second.
Those four commands are in a code block in a while(1) loop, which repeats endlessly, so the light keeps blinking.
/*
  Blink Light.c

  Blink light circuit connected to P26.
*/

#include "simpletools.h"                      // Include simpletools

int main()                                    // main function
{
  while(1)                                    // Endless loop
  {
    high(26);                                 // Set P26 I/O pin high
    pause(100);                               // Wait 1/10 second
    low(26);                                  // Set P26 I/O pin low
    pause(100);                               // Wait another 1/10 second
  }
}
Did You Know?
The simpletools library has lots of useful functions for controlling and monitoring circuits; high, low, and pause are just three examples. Click the SimpleIDE Help menu and choose Simple Library Reference to see a link to the simpletools library's functions.
Try This
You can make the light blink faster by reducing the pause function’s parameter. For example, to blink the light twice as fast, just reduce the pauses to half as long.
- Click Save Project As button, and save a copy of your project named Blink Light Faster.
- Modify the main function as shown below.
- Run the program and verify the output.

Your Turn
Try controlling the P27 light along with the P26 light.
- Modify your program so that it turns both lights on and off at about the same time.
- Modify your program so that whenever one light is on, the other is off.