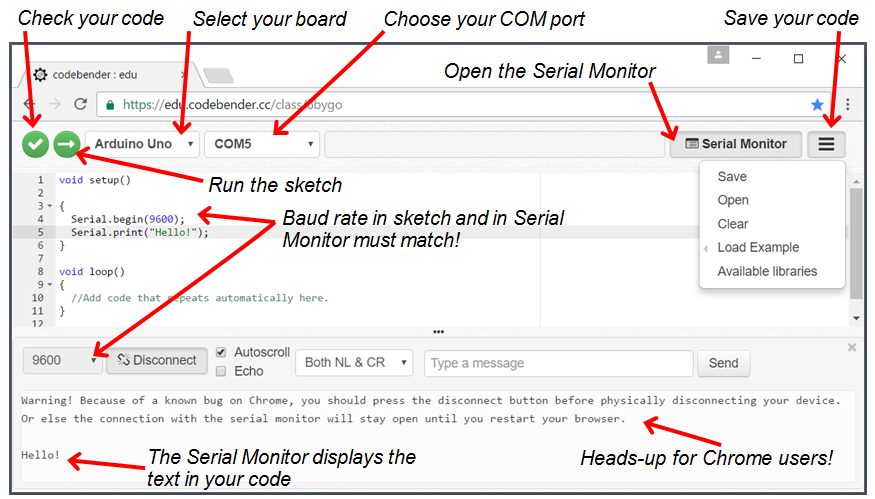
Now that you have an account to use with codebender : edu, and have installed the required plug-in and drivers, it is time to try a sketch!
- If your Arduino module is not already plugged into your computer with the USB cable, do so now.
- In a browser, go to your codebender : edu page.
- Type in the following code:
void setup()

{
  Serial.begin(9600);
  Serial.print("Hello!");
}

void loop()
{
  //Add code that repeats automatically here.
}
- Be sure you have capitalized “Serial” both times, or the sketch won’t work.
- Also, notice that the sketch uses parentheses() and curly braces {}. Be sure to use the right ones in the right places!
- To make sure that the code is written correctly, click the Verify button. Correct any mistakes before moving on!
- Choose Arduino Uno (or the board you are using).
- Select your Arduino's COM port is from the dropdown.
- Then, open the Serial Monitor pane by clicking the Serial Monitor button.
- Once the above steps are completed and your code is verified, click the Run button.
- Your Serial Monitor should be set to 9600 baud, then click the Connect button.
- Watch the Hello message appear in the Serial Monitor!
- Click the far right menu and choose Save to download your sketch.
Later, you can choose Open from this menu to re-open your sketch. Or, navigate to the un-zipped example code archive you downloaded previously to open sketches used in this book.

- If you are using a Chrome browser, be sure to read and always follow the warning that appeared in the top of the Serial Monitor: click its Disconnect button before unplugging your Arduino. Otherwise it will stay open until you restart your browser, and that could keep you from downloading code.
To keep things simple, the rest of the Shield Robot tutorials will feature directions and screen-captures for the Arduino IDE software.
