One convenient way to execute pre-programmed maneuvers is with functions. In the next chapter, your BOE Shield-Bot will have to perform maneuvers to avoid obstacles, and a key ingredient for avoiding obstacles is executing pre-programmed maneuvers.
The setup and loop functions are built into the Arduino language, but you can add more functions that do specific tasks for your sketch. This activity introduces how to add more functions to your sketch as well as a few different approaches to creating reusable maneuvers with those functions.
Minimal Function Call
The diagram below shows part of a sketch that contains a function named example added at the end, below the loop function. It begins and gets named with the function definition void example(). The empty parentheses means that it doesn’t need any parameters to do its job, and void indicates that it does not return a value (we’ll look at functions that return values in a later chapter). The curly braces {} that follow this definition contain the example function’s block of code.
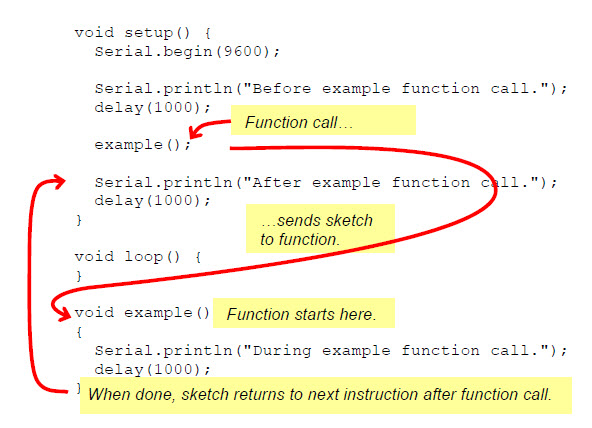
There is a function call to example in the setup function, labeled in the diagram above. That example() line tells the sketch to go find the function with that name, execute its code, and come back when done. So, the sketch jumps down to void example() and executes the two commands in its curly braces. Then, it returns to the function call and continues from there. Here is the order of events you will see when you run the sketch:
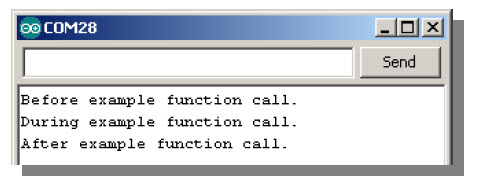
- The Serial Monitor displays "Before example function call."
- After a one second delay, the monitor displays "During example function call." Why? Because the example() call sends the code to void example(), which has the line of code that prints that message, followed by a 1 second delay. Then, the function returns to the example call in setup.
- The Serial Monitor displays "After example function call."
Example Sketch – SimpleFunctionCall
- Enter, save, and upload SimpleFunctionCall.
- Watch the upload progress, and as soon as it’s done, open the Serial Monitor.
- Watch your terminal and verify that the sequence of messages start with Before, then During, then After.
// Robotics with the BOE Shield – SimpleFunctionCall
// This sketch demonstrates a simple function call.

void setup() {
  Serial.begin(9600);

  Serial.println("Before example function call.");
  delay(1000);

  example();                              // This is the function call

  Serial.println("After example function call.");
  delay(1000);
}

void loop() {
}

void example()                            // This is the function
{
  Serial.println("During example function call.");
  delay(1000);
}