The whiskers are connected to ground (GND) because the plated holes at the outer edge of the board are all connected to GND. The metal standoffs and screws are touching the GND so they too are part of GND. The standoffs and screws provide the electrical GND connection to each whisker.
Since each whisker is connected to Propeller I/O pins P7 and P9, the cyber:bot can be programmed to detect which voltage is applied to each circuit, 3.3 V or 0 V. Your script can detect the pin’s state, HIGH or LOW, with the read_digital function.
- Look at the image below.
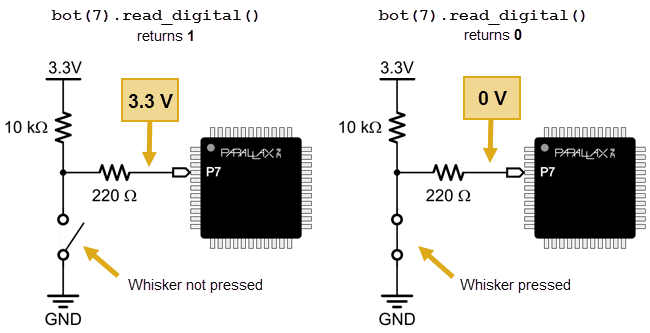
On the left, the circuit applies 3.3 V to P7 when the whisker is not pressed, so bot(7).read_digital returns a value of 1 (HIGH). On the right, the circuit applies 0 V to the pin when the whisker is pressed, so bot(7).read_digital returns a value of 0 (LOW).
Most importantly, your script can store the return values in variables, such as whisker_left and whisker_right, and then use them to trigger actions or make decisions. The next example script will demonstrate how to accomplish this.
Switch Lingo — Each whisker is both the mechanical extension and the ground electrical connection of a normally open (off until pressed) momentary (on only while pressed) single-pole (one set of electrical contact points), single-throw (only one position conducts) switch, SPST for short.
There are many other types of switches in contrast to this momentary single-pole, single-throw, or SPST. For example there are also double-pole, single-throw (DPST); double-pole, double-throw (DPDT); and single-pole, double-throw (SPDT). The SPST style used for our whiskers in the most simple style to construct.